
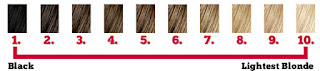
Above is a color scale / level from the most basic
standpoint in that we all know that there are variations of shades for each
level. For example, a level 2 - Dark Brown, could have a blue
undertone (reddish brown) or yellow undertone (golden brown).
Knowing these details, when you go to color your hair
or bleach your hair, keep in mind that you may not get the desire result
that you may expect.
Box color or bleach from Drug store:
Using a box color or box bleach from a drug store can
be a huge savings instead of going to a salon however, there are also
drawbacks, what you see on the side of the box - their color scale/level may
not necessary be what you will see on yourself, your result may be very
different. What they show you as an approximation based on the
assumption that your original color is the same as the picture without taking
into accounts your hair type, coarseness, strength, virgin hair or
colored hair and undertones. Additionally, the peroxide/developer in
those boxes is unknown to you and may or may not accomplish what
you would like it to accomplish. To understand more about
peroxide/developer, see my post about Understanding Peroxide and Developers
Doing your own highlighting and coloring using
professional products:
I was definitely a box amateur colorist for years (so I
will not knock box coloring), I have naturally dark brown Asian hair, so super
coarse and super thick, however, I hated how the color was always so dull and
wanted more of a reddish brown instead of the dull dark brown, so I
experimented with box colors and fortunately, I was extremely successful
(luckily, I grew up around a mother that does hair for a living, so my
confidence level was much higher than the average person with these
experiments). There were box colors that
I definitely liked over others, ironically, most of the time, not the ones that
are always in commercial either (e.g., Garnier Nutrisse) rather the super cheap
ones, like Revlon Colorsilk or Loreal Preference. Additionally, having
Asian hair is also a huge plus; my hair can take a lot of beating and not look
like it has been through the ringer. So with that said, what I did may
not work for you unless you have really coarse thick Asian hair.
My suggestion for you is to always educate yourself as much
as possible before starting. Coloring your hair with box color may not be
ideal for you if your hair is very thin, that is where this blog will help
you. With thin hair, I would suggest getting a cheap box of Revlon
Colorsilk (it's ammonia free) and test out a very small section, make sure to set a timer. From my understanding, developers have a decomposition time after a certain amount
of time, it stops working all together. See chart below:

If you decided you want to start using the professional
formula, say to color your hair and not lift, just simply to change to a nicer
shade of brown or a nicer shade of blonde, start with a 10 Volume developer and
always try it out on a small section of your hair first. With the professional formula, you can mix a
smaller quantity (see the back of your developer for instructions, typically it
is a 1 color to 2 developer ratio) or if you are looking to lift your hair to a
lighter color, start with a 20 Volume, test out a small section to see the
reaction before proceeding to do an entire head. And again, you can check every 5 minutes to
see how your hair reacts, rather than going with the 30 minutes processing time
suggested under the Understanding
Peroxide and Developers table. It is
always better to be safe than sorry.
Lifting or bleaching
your hair:
If you are to planning to lift your hair to a lighter shade (i.e.
bleach) your hair, having thin hair will not require as much processing time, I
would suggest checking every 5 minutes to see how your hair handles the bleach. It is definitely better to gradually go
lighter (meaning not in one process or within one day). Going from a level 2 to level 8 takes about a
month for me, I wanted to be safe so I did it in phases and conditioned with
coconut oil extensively before starting the process (2-3 days) in between phases to keep my hair healthy. See my upcoming post for details on each phase and I am planning to create a video soon (targeted for end of October).
Heat effect on coloring and bleaching:
Aluminum foil is often used during highlighting to keep the bleach active, without it, the bleach dries up and stop working. Additionally, sometimes at salon, they put you under those big hair dryers to help expedite the lifting process. Below is a picture illustrating the impact of heat on bleach hair using different developers. So this could be something you can do with lower developer to test out on a small section of your hair in an expedited way for faster result.
This experiment was conducted professionally as part of a cosmetology curriculum that my mom went through. These were done using a standard blow dryer at cool=80 degrees, low=90, medium=100 and high=110. The color results appear closer at higher heat was used.

No comments:
Post a Comment